Sunday 30 August 2009

SMS - Fresh Peach Muffins

I managed it this week! A Sweet Melissa Sundays post on a Sunday – yaaaayyy! Wonders will never cease…

So this Sunday it’s Fresh Peach Muffins and it’s hosted by Mrs G of The Givens Chronicles. Do spend some time looking at all the other awesome posts on the blogroll.

I was so excited when she chose this recipe – this is just the kind of recipe which makes me so pleased I joined SMS. It’s not something that I would normally pick to bake from a cookbook – don’t get me wrong, I love peaches but it’s the muffin part. I’ve just never had that much success with them. I guess I put it down to the UK flour (we can’t get cake flour over here. After much research, it turns out there’s something in the bleaching agents used that means it can’t be sold in the UK. Boooo!) or the inconsistencies associated with cup measurements*, but I always ended up with large, dense cupcakes rather than light, fluffy muffins with the characteristic muffin tops.

But not here! I did fear for their success at one point as the one thing you shouldn’t do with cakes is overmix and I gather that’s especially true of muffins. Of course, I did these at 9pm and so messed up the method entirely – I totally forgot to add the fruit to the flour mix, something which stops the fruit from all sinking to the bottom, and I had started filling the cases before I remembered they needed cinnamon. So the small amount of mixing went out the window and these were fairly thoroughly mixed!

While I wouldn’t recommend overmixing (and I certainly wouldn’t recommend late night baking in a rush) they turned out perfectly! A touch too much orange zest for my liking so I’m going to ease up on that next time, or maybe use lemon or use orange juice instead of milk. Just needs a slightly more subtle orange flavour in my opinion but maybe my zesting was a little too zealous! Although all my testers disagree with me on that one and thought the orange added a freshness to the muffin so I might be wrong...

The one thing that’s a unanimous yes is the addition of raspberries – something I just had to add as soon as I’d seen this week’s recipe. Is there a more perfect pairing than peaches and raspberries? I used the 1 cup of chopped peaches specified in the recipe (2 regular sized peaches, peeled** and chopped) but also threw in a cup or so of raspberries. The raspberries add a gorgeous tartness as well as pretty pink streaks to the muffins.

All in all, a definite addition to my recipe collection! Perfect for a lazy breakfast. Next week it’s fallen chocolate soufflĂ© cake. I’m dreaming about it already…


Rosy x

*so much so that I actually never measure anything but liquid in cups. I normally go though a recipe and convert everything to grams first using this website – it’s the scientist in me! I crave precise measures! Seriously, it nearly killed me measuring out a cup of chopped peaches but there’s no conversion for that. Although now I know! 2 peaches.

**I find that the easiest way to peel a peach is using the tomato method – slice a cross in the skin on the bottom of the fruit without cutting too deep. Then cover in boiling water until you see the cuts expand down the fruit (normally a minute or so). Plunge into cold water and the skins should peel away like a dream!

Friday 28 August 2009

Whoop Whoop it's the Weekend!

It's all very thrilling as it's a bank holiday weekend her in the UK so a lie in on Monday!!! Oh so exciting. That's what happens when you have a job - an extra day off becomes just about the most thrilling prospect in the world! I do miss the carefree days of uni sometimes...

I thought that I'd leave you with a pic from a very special post I'm working on for next week (or when I actually get around to finishing it!).

Have a lovely weekend and I hope the sun shines all weekend long!

Rosy xx

Tuesday 25 August 2009

Marshmallows

I was pondering what to blog about next and I got to thinking about what appealed to me about blogs in the first place. I've always loved baking - my Mum's a fantastic baker - and whenever I was on school holidays I used to spend days in the kitchen baking up treats. I'm sure it was a nightmare for my Mum to clear up after the whim took me to make fudge! Something I still have yet to master. Anyway, when I moved into my own house, I cooked more and more. Not just baking but savory too which I'd never been that strong on before.

Wanting to develop beyond Victoria sponges and cupcakes, I wanted to find out how the pros did it. How were those patisseries created? How did they make the super thin jelly layer atop the elegant layers of mousse and sponge? How was the sponge made that thin without drying out? What made the perfect chocolate chip cookie? In search of answers, I researched cookery courses but there was a dramatic gap between the courses teaching you how to bake a sponge or make a tart and the year long diplomas that covered the trickier techniques. But nothing in between! And then I discovered blogs. Professional pastry chefs describing how to recreate some of those signature dishes in a domestic kitchen! Admittedly, sometimes the instructions are all too brief to fully cover the method for achieving the professional look (I'm guessing some things need to remain a secret!) but they get you a good 90% of the way there. So far, I've been really chuffed with some of the things I've produced. Yes, I can't yet master macarons but I blame that on my rubbish oven and lack of a decent food processor! But some things, such as mousses, have been a great success. Through such experimenting, it's also possible to identify what the basis of the recipe is and how it can be modified to your own ends, then allowing ultimate freedom to experiment.
One of the things I've longed to make for a while now (since investing in a sugar thermometer) is marshmallows. When homemade, they're a far cry from the synthetic foam available in the shops. They're more like fluffy, sugary vanilla clouds. Totally addictive!

So here's how to make them. They really are very straightforward - people often get scared when it comes to boiling sugar but use a thermometer and it's easy as anything. Have a go and see! So many things can be created from a base of sugar syrup. Now that I've gotten the hang of the basic recipe, my mind is whirring with possible flavour combinations! Marshmallows

320g sugar
12g glucose syrup
130g water

40g powdered gelatine (3 sachets)
130g water

45g egg whites (1 large egg’s white)
pinch of cream of tartar
20g sugar
1 tsp vanilla essence

Line a square tin (I used a 10” square loose bottom tin) with clingfilm and lightly grease with flavourless oil (such as vegetable or sunflower).

In a small saucepan with tall sides, combine the sugar, glucose syrup and 130g water. Cook to 126C.

In the meantime, whisk the powdered gelatine and 130 grams of water together and let the gelatine bloom.

Place the egg whites and the cream of tartar in the bowl of an electric mixer and start whipping in medium speed. When the egg whites are almost fully whipped, add the 20 grams sugar and continue whipping in slow to medium speed depending on how far the sugar syrup is from reaching the desired temperature.

When the sugar syrup reaches 126C, turn the heat off and add the bloomed gelatine (will be a solid mass) to the saucepan. It will bubble up so be careful. Whisk until the gelatine dissolves completely in the syrup.

Add the syrup with the gelatine into the whipped egg whites while whipping in low speed. When all has been added, turn the speed up to high and let it whip until ribbons start to form. Add any flavouring and/or food colouring at this point. We don't want the marshmallow to cool completely because we want to be able to spread it. Remove from mixer and pour into the lined tin. Let it set at room temperature (a couple of hours).

Mix together half icing sugar and half cornflour (about 50-75g of each is sufficient). Sift onto a chopping board and turn out the marshmallows onto the board. Peel off the clingfilm and sift over more icing sugar/cornflour mix. Cut into squares, or whatever shape floats your boat, using a sharp, wet knife and toss in the icing sugar/cornflour mix.

These will keep well in a ziplock bag and freeze beautifully.

Rosy x

Sweet Melissa Sundays - Mom's Banana Apple Bread

Ok, so this is technically a Sunday post but due to a rather busy weekend I only got around to making the recipe last night - I shall do better next weekend, I promise!!

This is my first SMS posts which is rather exciting! And I'm really pleased to be involved in such a fun group. The idea is that a group of food bloggers all bake the same recipe (modifications allowed) from the 'Sweet Melissa' recipe book. This Sunday Joy from Hot Oven, Warm Heart chose Mom's Banana Apple Bread. Check out the other bakers on the blogroll!

I'm a huge fan of banana bread - not a huge fan of bananas, but when turned into a tea loaf they create a luscious, sweet, dense cakey bread. This was no exception. Not being in possession of a large loaf tin, I made a small loaf and 4 little cakes with my super cute individual springform cake tins. The loaf was exactly as per the recipe. In two of the small cakes, I threw in some sultanas...In the last two, I placed a layer of sliced caramelised apples on the bottom. Just for kicks. I'm that kinda gal. That, and who doesn't like a layer of caramelised apples?
I did love the plain loaf but felt I'd gone to so much extra effort caramelising the apples that leaving it plain was just a waste, so on the little plain cakes, I iced them with a simple cream cheese icing.
And that was good! Of all the modifications I messed around with, the addition of the icing was the best. It's actually the same icing I use on my go-to banana bread and so I guess it's no surprise that it worked like a charm on this one. And there's the only issue I have with this recipe - it's just too fiddly.
Banana breads for me are a quick bake - something I can whip up with some left over almost dead bananas, a cake that keeps well and goes perfectly with a cup of tea. This recipe called for dicing and caramelising apples which, whilst helping the texture, added a chunk of time onto the prep. So yes, this is undoubtedly delicious and I'm thinking of incorporating the spice mix into my banana bread recipe, but I'm still on the fence as to whether the frying of the apples is necessary... I might try it again but not actually cook the apples first - I'll keep you posted!
Rosy x

Wednesday 19 August 2009

Katiecakes' First Giveaway!

Very exciting news - one of my fave blogs, katiecakes, is having her first giveaway!! And this book is the prize. I'm so on board with healthy cakes - I then have a good justification for scoffing lots and lots! Anyway, pop over to her blog and check it out!

Good luck,

Rosy x

Tuesday 18 August 2009

Summer Fest - Tomatoes!

I'm so thrilled - although it's the last of this year's Summer Fest posts, this is actually the first of the Summer Fest posts where I've had my OWN VEGGIES to show off!!! Yes, that's right, our tomatoes have ripened. I really didn't think that we were going to have much success with the tomatoes - I've never grown them before and they weren't something that my parents grew when I was growing up so I guess I just figured that without a greenhouse, we wouldn't have much luck. But look at them all!! The ones above are a currant tomato and boy, they're so sweet. Little intense explosions of tomatoeyness (yep, that's a word). The ones below are a hanging basket cherry tomato. They hang just next to our patio furniture so great for sitting out on a sunny evening with a glass of wine and nibbling on home grown tomatoes... That's what growing your own is all about!
We really didn't think they were going to make it as they've been transplanted about a million times and then were knocked over about another hundred times. It was only a month ago that they were planted into hanging baskets (or hanging pots really). But wow, they've certainly come up trumps. They're all weighed down like this one with lots of beautiful fruits. YUM!!!

Alas, there aren't quite enough ripe ones for cooking with yet. But I grabbed these lovelies and whipped up a light, summery tomato sauce to go with home grown beans and home grown courgettes and baked salmon. Just perfect - can you tell I'm proud of our growing achievements??!

There's not really a recipe - all I did was chop up a red onion, fry in a little oil until nice and jammy, throw in a chopped red pepper (only because I had a questionable looking one in the bottom of the fridge). Then add a couple of cloves of garlic, sliced, and deglaze with a slosh of balsamic vinegar. I then added a teaspoon of brown sugar (I always add a tsp of sugar to tomatoes - really helps the depth of flavour). The tomatoes were peeled and chopped (you can use a can if you don't want to bother with peeling tomatoes) and added with a tablespoon of tomato puree and a good season before letting it bubble away gently. Simply boil for longer for a richer sauce but I was after a fresh, light sauce to go with the salmon.

We're having the left over sauce with pasta for a super quick supper dish tonight!

Rosy x

Monday 17 August 2009

A Relaxing Weekend and Garden Envy

This weekend, JJ and I spent a relaxing weekend with his parents and Granny for his Granny's 85th birthday! They have a gorgeous house in the countryside about an hour outside of London and it's always such a pleasure visiting (thank you very much for having us if you're reading, Mrs J!). Eating afternoon tea in their garden is just the best way to spend a sunny sunday afternoon - the victoria sponge was filled with bramble jelly which I managed to snaffle a jar of as we were leaving. Thinking it'll be the perfect accompaniment to macaroons that I'll be whipping up later in the week!

The weather really was stunning which always helps when enjoying a weekend in the country! We did lots of terribly English things, such as picking wild blackberries...
(shortly after this was taken I had to be rescued by JJ's Dad after becoming thoroughly entangled in the brambles. Why are the juciest looking berries always just out of reach? It's true of blackberries and it's true of life) ... barbequeing....A very serious business, as you can see!
... and developing MAJOR garden envy.
I'm always so jealous of their beautiful garden filled with fresh, homegrown produce, especially as I returned to our little plot to find that our lovingly grown butternut squash that were just starting to develop had been eaten by something (rats or foxes are the top of the list of suspects). So disappointed! They were doing so well!! Here's their pumpkin patch and a pumpkin which is apparently supposed to be a bluey colour. Very unusual.

Here are a few more snaps of the garden - just a sample of how much incredible produce they have growing! We walked away with a bag brimming with lovely fruit and veg and now thinking up all kinds of exciting things to do with it all!These are damsons, in case you haven't come across them before. They're lovely made into jams and chutneys.

I have no idea what these pods are but I thought they were interesting. I hope everyone had a lovely weekend - I'd love to know what exciting things everyone got up to! Pop something in the comments box - will help to cheer up Monday morning!

Rosy x

Tuesday 11 August 2009

Summer Fest Week 3 - Risotto

Ok, so this is going to be a quick one tonight - I've just done a session with British Military Fitness and I think I might die. It hurts! Every muscle in my body is in pain... But I have to say it was a lot of fun. But it does mean that this week's Summer Food Fest post is a little shorter than usual!
For this week's theme of beans and greens I thought I'd whip up a quick, classic risotto primavera (despite it being estate) with some of the great greens around this time of year. I adore peas although I must confess these are of the frozen variety! I'm of the opinion that unless you grow them, peas aren't really worth buying fresh. The asparagus and broad beans I also decided on are two of my favorite green vegetables. Come to think of it, I'm a huge fan of green veg, especially al dente. Nothing worse than mooshy green veg.

I'm waffling - it happens when you've had a scary sergeant screaming at you for an hour to do more burpies. Whatever they are.
Risotto Primavera
300g Risotto rice (I use carnaroli)
600g broad beans (weighed still in their pod - about 150g shelled or frozen)
150g asparagus
200g peas
1 litre of stock (I used a tsp marigold stock powder, dissolved)
1 large shallot, finely chopped
3 large spring onions, trimmed and chopped
1 fat garlic clove, lightly crushed
2 tbsp olive oil
50g butter
125ml white wine
1/2 lemon
Parmesan and seasoning

Have the stock in a pan simmering away. This really does make a difference to the texture of risotto.

First thing to do is peel the broad beans - double pod them, if you will. To do this, take the de-podded beans and blanch for 1 min in boiling water before rinsing under the cold tap. Peel off the tough outer skin. If you're using frozen broad beans, let them defrost and they should peel easily.

Heat a heavy based saucepan with the oil and half the butter in. Saute the shallot, spring onion and garlic for 3-5 mins until softened. Then add the rice, stirring until coated with the oil/butter mix.

Add the white wine and let it sizzle away for a few mins to evaporate off the alcohol. Once the rice has absorbed most of the wine, add the stock, a ladelful at a time. You probably won't need all the stock. Keep adding the stock, gently stirring the rice as you go, until the rice is no longer opaque in the centre, is a little al dente and smooshes easily when pressed between your finger and thumb.

Once the rice is cooked, add the peas, a good grating and Parmesan, the rest of the butter and a generous season. I also added some grated lemon zest and a squirt of lemon juice, but if you don't have one to hand don't get overly concerned. Pop the lid on and let the rice rest while you cook the asparagus and broad beans. These need 4 minutes in boiling salted water. Drain and carefully fold into the risotto. Top with a bit of grated Parmesan and some freshly milled black pepper and enjoy!

Rosy xx

The London Look

My bff has set a challenge on her blog and what kind of friend would I be not to contribute?! That, and there's a prize at stake... The question asked was 'what is the London look?'. For those of you in England, you'll know the (REALLY annoying) Revlon advert feat. Kate Moss pouting into the camera saying 'get the London look'. I have always wondered what on earth that means. You would too if you've ever wandered around Soho of a Saturday night... I fear that this isn't the blog to detail that London look!
Initially I figured I'd cook something. But I wasn't sure I could describe food as being from London. England, yes, but London specifically? Not so sure. So I pondered a while as to why it is I love living in London so much and what is it that makes it such a fantastic place. And I have come to the conclusion that it's the parks. It's a huge city so of course there's all the usual great things such as fantastic restaurants, amazing markets, shops to suit every whim and more bars and pubs than you could ever hope to get to in a lifetime. But what's so fantastic is that, amidst all the hustle and bustle, there are literally hundreds of parks.
I did a bit of research and it turns out that London is one the greenest capital cities on earth, with more than 600 garden squares, 148 parks and gardens,122 heaths, commons and greens, 16 city farms, 8 Royal Parks and even 1 historic battlefield (in Barnet). Now, I have no idea what the difference between a park, heath, common and green is, but I can assure you that London parks are worth a visit.

I'm not one for frequenting the Royal parks, amazing as they are, purely on the grounds that they're actually quite a way away from our flat. I used to live in Crouch End, before JJ and I moved in together, and as I was flat sharing with 2 other guys, things were a little on the cramped side! So I will always have fond memories of the long walks JJ and I used to take, meandering through Waterlow park, down into Highgate and across Hampstead Heath, taking in the view from Parliament Hill. Just stunning. Of course the motivation for such a long walk was cake! Gail's in Hampstead makes the most unashamedly rich chocolate cake that even I can't quite eat a whole slice of. It's immense.

On our long weekend a couple of weeks ago, JJ and I decided to pop up the road to Waterlow park again as it's such a gem. It's on the edge of Highgate Cemetery too, which is the final resting place of many famous individuals, most notably Karl Marx, but also Douglas Adams (the author of Hitchhiker's Guide to the Galaxy), Alexander Litvinenko (Russian dissident, famously murdered by poisoning in London in 2006), George Eliot (author) and a clutch of Rossettis. We have yet to go in (you have to pay and yes, we are that cheap) but from the street you get a glimpse of the stunning Gothic tombs and buildings.
In Waterlow park, it's just incredible to think that you're in the middle of such a noisy and busy city. London time seems to go that much faster than the rest of England and having such a haven close at hand (and you'll find most Londoners have an equivalent) is just what is needed to stop you from loosing it when you've been barged on the underground one too many times! Londoners are not on the whole all that friendly... Especially at rush hour. So this is, to me, the London look. A place to escape without actually having to do battle with public transport or roads.
This bee is just too cute. It's covered in pollen from rummaging around in the flower! The lavender was swarming with them - that'll be some good tasting honey.
Rosy xx

Monday 10 August 2009

Cupcakes

What a weekend! I'm so exhausted but it was well worth the effort. I hosted my friend Laura's birthday party, with an Alice in Wonderland theme. We lucked out with the weather (as it's been utterly miserable in the UK this summer) and it was held in the garden, which was full of hanging lanterns and playing card bunting. We made items to dot about the garden to represent some of the main characters, so there was a smile hung in one of the trees, a hookah pipe and the mad hatter's hat. Our neighbour's cat even decided to join us!

The food was an afternoon tea, so cucumber sandwiches (in the shape of tea pots! too cute) and jam tarts, as well as the birthday girl's cake...

I’m definitely no master of cupcakes – sugar craft isn’t really my thing as I just don’t have the patience – but I love how a bit of piping and a cute flower can make a simple sponge simply irresistible. And on that note, I always used to use a classic sponge recipe for cupcakes but found them slightly greasy. So I turned to the good ol’ US of A for inspiration and, more specifically, Magnolia Bakery. Where else? This is their recipe and I have to say I infinitely prefer this recipe to a classic sponge. I used their icing for the Christening cupcakes (shown below) and it was very good. For the Alice in Wonderland cupcakes I attempted a swiss meringue buttercream - it turned out well but after tasting it, I decided that I couldn't eat a large amount of it so switched to my fail safe recipe shown below. I think the swiss meringue buttercream would work well on a large cake but I just couldn't imagine it on a cupcake.
As always with baking, have all your ingredients at room temperature and don't open the oven for as long as you can resist!
Vanilla Cupcakes
Adapted from Magnolia Bakery Cookbook
345g Plain Flour
3 tsp Baking Powder
pinch salt
230g Unsalted butter at room temperature
400g Caster sugar
4 eggs at room temperature
240ml milk
1 tsp vanilla extract
Preheat oven to 350F/170C.
Line two 12-cup tins with cupcake papers.
In a small bowl, combine the flour, salt and baking powder. Set aside.
In a large bowl, on the medium speed of an electric mixer, cream the butter until smooth. Add the sugar gradually and beat until fluffy, about 3 minutes. Add the eggs, one at a time, beating well after each addition. Add the dry ingredients in three parts, alternating with the milk and vanilla. With each addition, beat until the ingredients are incorporated but do not overbeat. Using a rubber spatula, scrape down the batter in the bowl to make sure the ingredients are well blended. Carefully spoon the batter into the cupcake liners, filling them about three-quarters full. Bake for 20–25 minutes, or until a cake tester inserted in the center of the cupcake comes out clean. This timing will vary depending on the size of cupcakes you opt for. Mine only took about 12-15 mins (alothough I don't have a timer so don't hold me to that!) as I was using mini cases.
Cool the cupcakes in the tins for 15 minutes. Remove from the tins and cool completely on a wire rack before icing.
For the icing, simply use twice the weight of icing sugar to unsalted butter (I used 230g butter and 460g icing sugar). Beat them thoroughly with a pinch of salt and a good teaspoon of vanilla, plus a tablespoon of milk. Colour as desired and pipe onto the tops of the cakes.
For the decoration, I cut out flowers from sugarpaste and shaped them using the contours of an egg box. I cut out little discs and piped 'eat me' onto them, made little toadstools and white roses. Then, for added Alice in Wonderland reference, I half painted the white roses red. Almost too pretty to eat! 
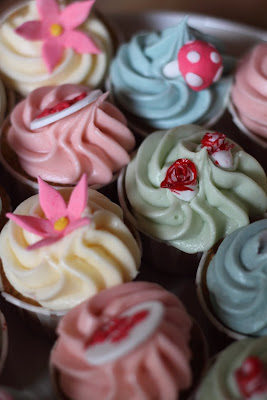
These ones were for Lydia's christening. I used the same sized flower cutter and piped an L on little white discs. Very easy but effective!

Rosy xx